Spectrum Color Guide
Spectrum Color Guide
Our Spectrum Color Guides are central to the increased precision, nuance, and accuracy our test kits provide. These Spectrum Color Guides are easily accessible in a convenient, pocket-sized, spiral-bound booklet, and are included with each kit. They include detailed explanations, thorough instructions, and tips and tricks to ensure results are clear and precise.
How do you use our Spectrum Color Guide booklets during a test?
The basics:
- Place a very small amount of your substance in the test tube.
- Add one or two drops of the provided reagent liquid.
- Observe as a color change takes place over the course of a minute, or film the reaction for later comparison.
- Match this color change over the course of one minute to the color guide, or to our drug reaction videos on the Android app, or on our Vimeo channel.

WHAT DO YOU MEAN BY “SPECTRUM?”
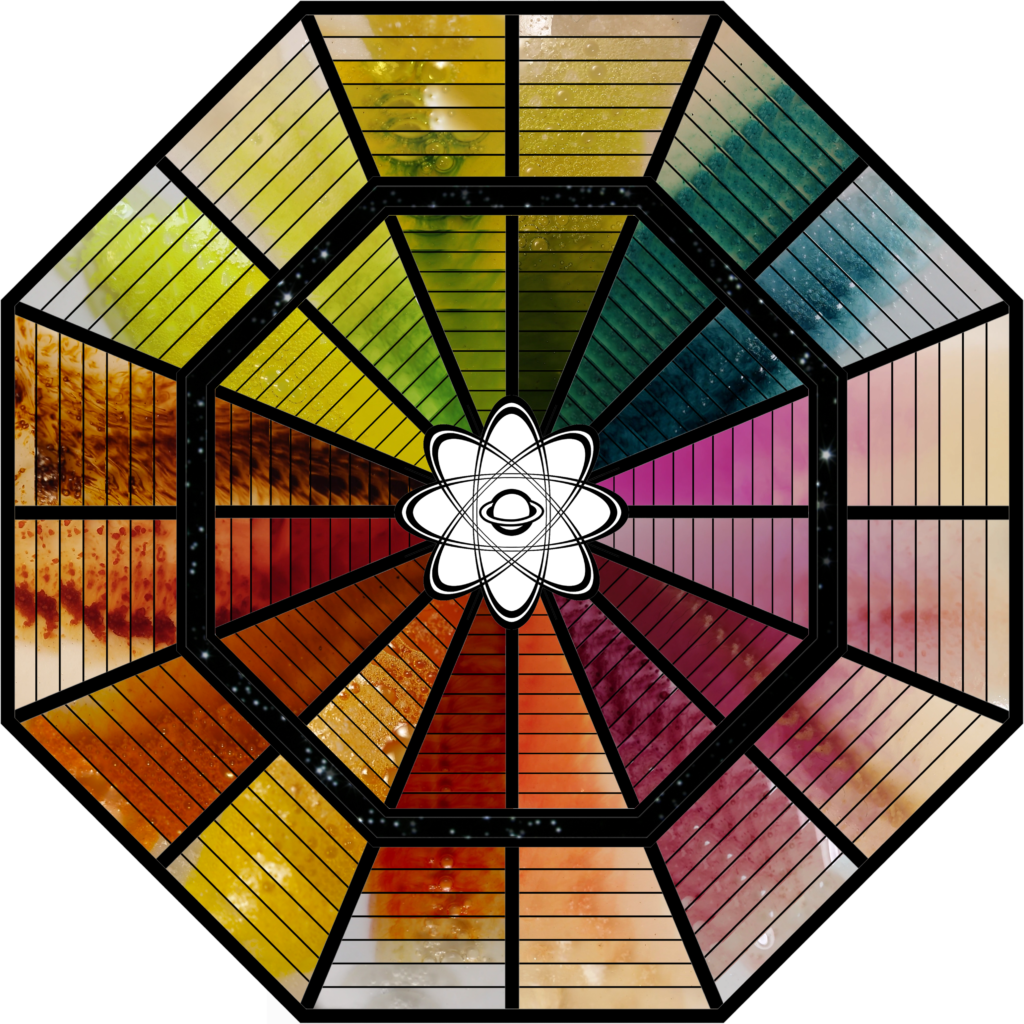
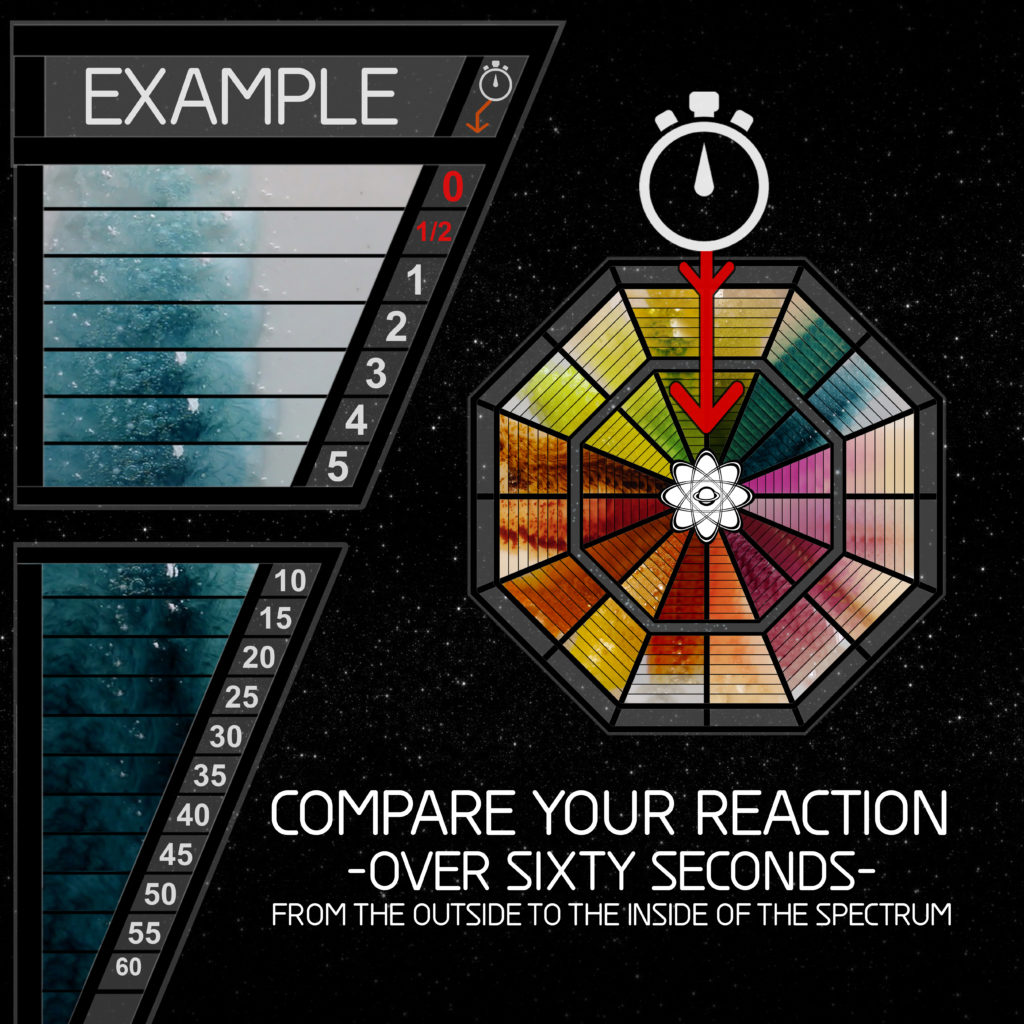
We utilized each one of our kits to test hundreds of lab-verified pure substances—and filmed the results. For each test, the reaction footage was “chopped up” frame by frame and displayed in sequence, showing exactly how the color changed over time. The reactions each begin at the outside of the spectrum and move towards the middle over the course of 60 seconds. This allows for a more accurate comparison and conclusion when watching your substance react.
Every reaction in the booklet is also available in video form on our Vimeo channel, or through our Bunkleaks Android App. You can watch these videos in real time on your phone, tablet, or TV as you’re conducting tests. Quick tip: Record your test kit reaction with your smartphone so you can replay it later, even in slow motion.
READING THE COLOR GUIDE
The largest “cell” (the outermost section) is the color change at zero seconds (the exact moment the liquid hits the sample). Moving inwards, the second cell is at 1/2 second, the next, at one second, then two seconds, three seconds, and so on—until you reach the middle of the spectrum, which indicates the end of the reaction at 60 seconds.
GETTING THE MOST OUT OF YOUR RESULTS
These booklets don’t stop at our Spectrum Color Guides. Another incredible feature is the ability to know what cutting agents you need to watch out for.
It’s important to read the results that actually apply to your sample, and not search for ones that would never appear. For instance, if you’re testing MDMA, you would very rarely, if ever, find DMT in that sample—so why look for it? We’ve made it easy to figure out which reactions matter for the substance you’re testing, and which ones don’t.
The image below is a substance symbol key. Each of these symbols represents a mainstream substance—in other words, the substances most people use our kits to test (like MDMA and cocaine).
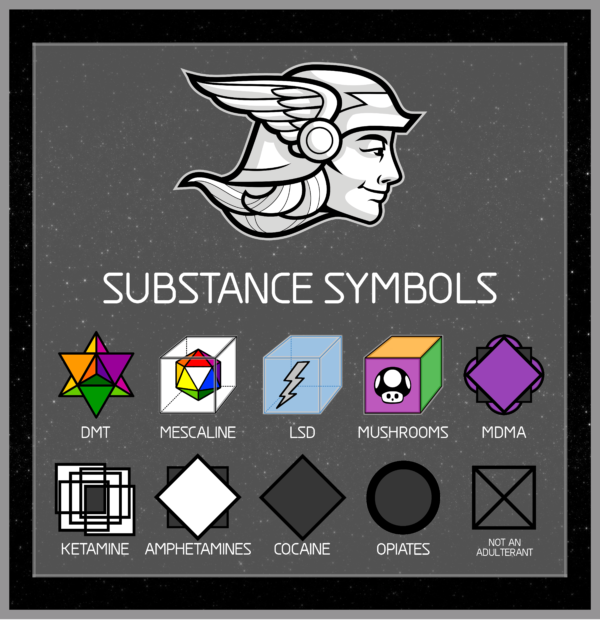
In the next image, you’ll notice these symbols in a row on the upper right hand side of the chart, with various substance names on the left. First, find the symbol representing the substance you’re testing, then follow the line beneath it to see the red X‘s. The substances to the left of the X’s indicate the research chemical/cutting agents that have a high likelihood of being present in your substance.
For instance, when testing MDMA, only the substances with red X’s under the MDMA symbol are the ones that the tester should be watching out for. In this case, methylone and 4-FA. The rest of the substances—without red X’s under the MDMA symbol—do not apply when testing MDMA.
Now, let’s see how this works in practice.

HOW THIS WORKS IN PRACTICE
Let’s go through a specific scenario. You test what you believe is MDMA with the Marquis spot kit. The reaction is supposed to be purplish-black, but instead, it reacts as green—indicating that it is not MDMA. Here’s how you can figure out what it might be:
- To start, flip through the booklet (which is sorted by color) to find any green reactions.
- In the image below (on the right), you’ll see there are eight green-colored possibilities—so we need to figure out which one it is.
- In the image below (on the left), you’ll see there are three red X’s connected to different substance possibilities—ethylone, 2C-B, and DXM. These are the adulterants that are cause for concern when testing MDMA and observing a green reaction.
- Any other reactions on the chart that do not have red X’s under the MDMA symbol are not of interest for this test. This indicates they are not likely to be present when testing MDMA.
- We can immediately rule out DXM, because it does not have a green reaction. That leaves us with 2C-B and ethylone.
Let’s say the reaction started out light green, and then at 15 seconds turned medium green. Starting from the outside of the spectrum (on the right) moving towards the center, we look at the color time lapse for ethylone and 2C-B. A reaction that moved from light to medium green looks more similar to the reaction for 2C-B than for ethylone—so we can conclude our adulterant is most likely 2C-B.

Please note that fentanyl will not react clearly with spot kits. You should always test for fentanyl using our FentKits, and not with spot kits.
NON-REACTIONS ARE IMPORTANT
“Non-reactions” are when a substance does not react at all—either by remaining clear or remaining the original color of the test kit liquid.
This is critical in certain cases. For example, if you’re testing suspected cocaine with the Marquis kit, you should not see a reaction. Many substances that are commonly mixed with cocaine will react with Marquis, such as methamphetamine and various cathinones. If you do see a reaction of any kind, this indicates that one of these other substances is present in your sample. This example applies to several other spot kits / substances, and is a very effective tool for identifying dangerous adulterants.